
Practical guides
AI Room Design: How to Keep Your Layout More Consistent
Start with a clear room photo, separate fixed features from design changes, and review each AI concept before refining it.
To keep a room layout more consistent in AI redesigns, start with a clear photo, describe the visible features that should stay, and request a small set of changes. Review the architecture before judging the new colors or furniture. Continue only from a result that still resembles the room you actually have.
A prompt such as ‘keep the layout’ expresses your intention; it does not lock walls, windows, or furniture. An attractive concept can still widen a window, remove a radiator, or change a doorway. The workflow below helps you make those differences easier to spot and gives you a practical way to decide whether to refine a result or return to the original image.
1. Choose a photo that explains the room
Use one clear view that includes the area you want to change and enough architecture to place it in context. For a living room, that might mean the sofa wall, the main window, and part of the floor. A close-up of cushions gives little information about how the seating relates to the room.
Keep the camera level where possible. Avoid panoramas, strong wide-angle distortion, and a tilted view that makes vertical walls lean. Open curtains enough to show window edges, but avoid a bright window that leaves the rest of the room unreadably dark. Remove temporary clutter if it hides a feature you need to preserve.
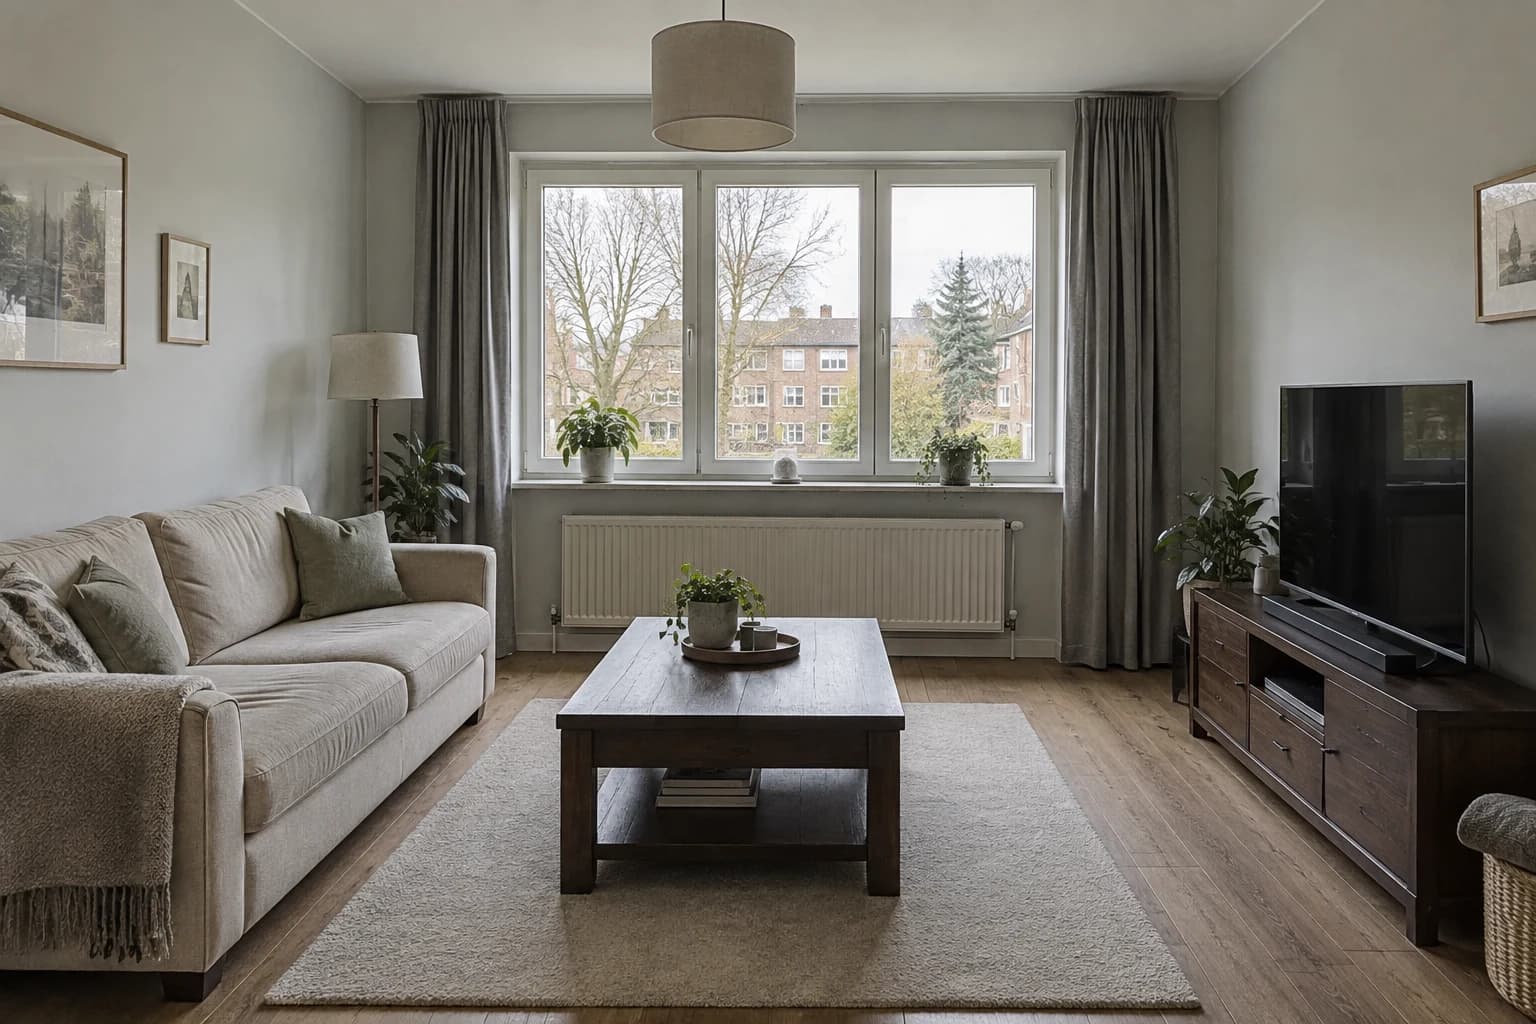
In the illustration above, the sofa on the left, the three-panel window, the radiator below it, and the cabinet on the right give us a short list of visible anchors. Your own list may include a fireplace, an alcove, or a doorway. Only describe what your photo actually shows; the model cannot reliably establish the room beyond the frame.
Vizterior accepts JPEG, PNG, and WebP images up to 10 MB, with each dimension at least 512 pixels and a maximum of 64 million pixels. Choose a clear original within those limits. Enlarging a blurry file does not recover missing architectural detail.
2. Separate what stays from what changes
Before generating, write two short lists: visible features to retain and finishes to explore. This makes your brief easier to review than a paragraph containing every possible renovation idea. Distinguish the architectural layout from the furniture arrangement: keeping the walls does not necessarily mean keeping the sofa in the same position.
For the illustrated room, the fixed list could include the window divisions, radiator, ceiling line, sofa position, and television cabinet position. The change list could be limited to the wall color and curtain fabric. Do not ask for a complete open-plan transformation if your actual goal is to see a warmer palette in the existing room.
Use concrete relationships such as ‘sofa against the left wall’ instead of ‘everything exactly the same.’ A short, specific list also gives you a reference for reviewing the result: you can check each feature against your brief instead of relying on an overall impression.
Keep
The visible camera view, window openings and divisions, radiator location, ceiling height, and positions of the main furniture pieces.
Change
Only the wall finish and curtain fabric for the first exploration. Leave flooring, furniture, and lighting changes for separate decisions.
3. Review the architecture before the styling
After generating a concept, look past the appealing materials for a moment. Compare it with the input image and work around the frame in the same order each time: ceiling, openings, fixed fittings, furniture positions, then floor. This is a visual review you perform, not an automatic geometry check.
Count the window divisions and doorways. Look at where the window meets the adjoining wall, whether the radiator remains visible, and whether a cabinet now blocks an opening. Notice if the camera appears to have moved or the floor has become much deeper. A change in perspective can make a room feel larger without representing a feasible design.
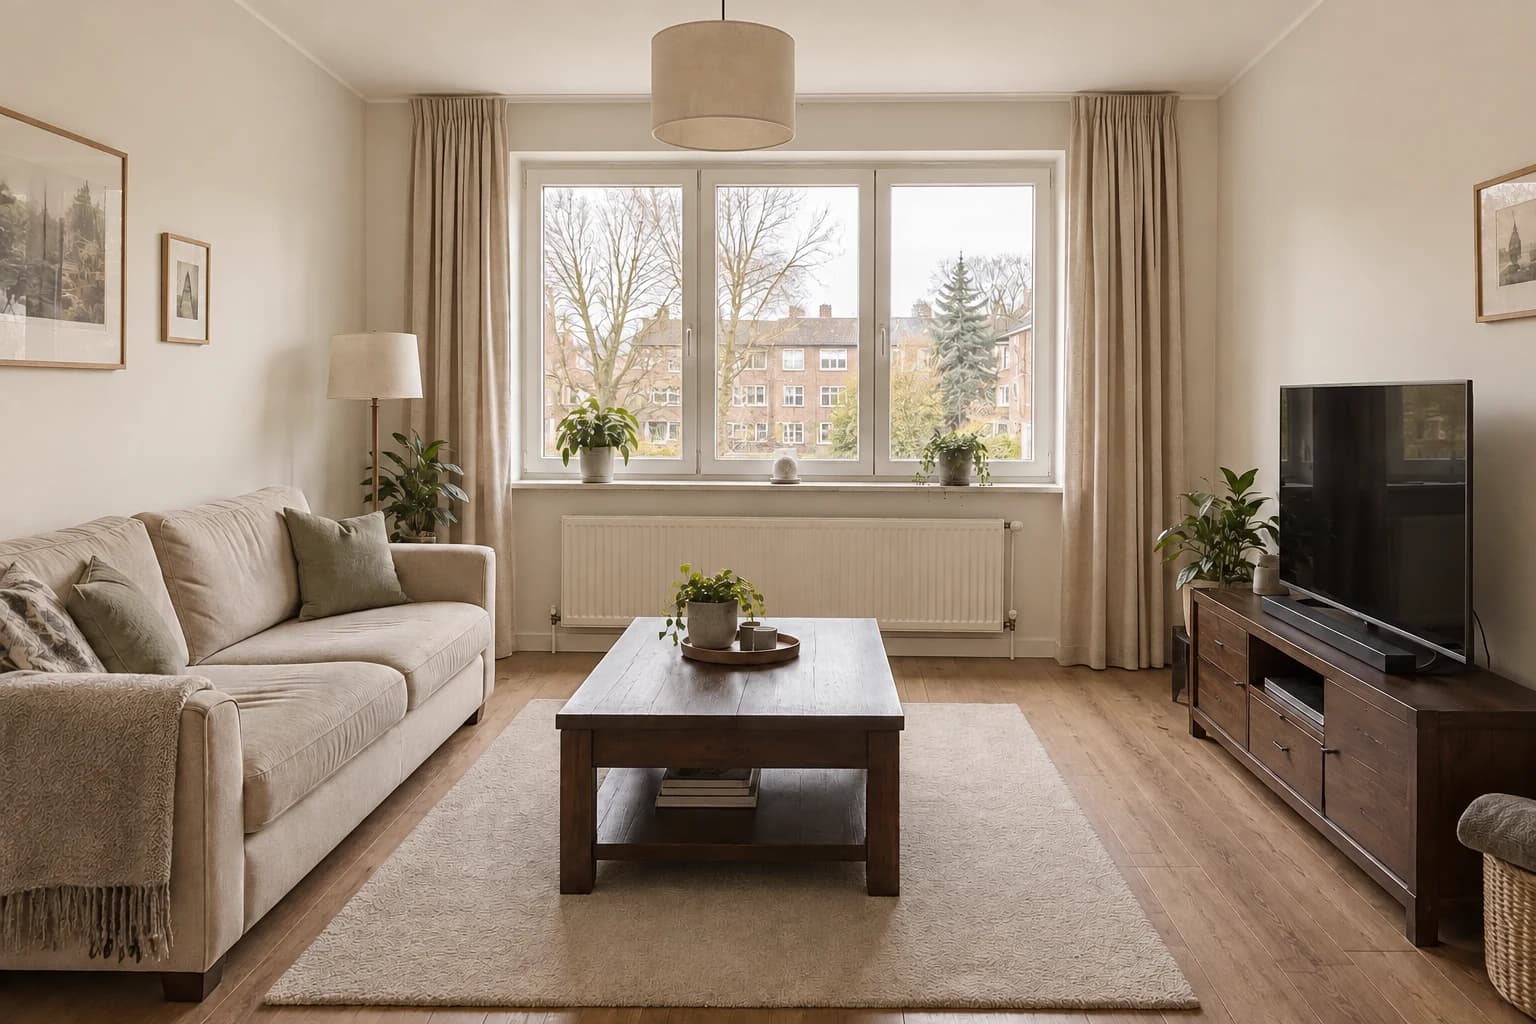
Then assess the requested changes. In the first concept below, the grey walls become a warmer off-white and the dark curtains become natural linen. The three-panel window, radiator, sofa and dark coffee table remain recognizable. Look closer: the rug texture and overall warmth also shift. This is why a focused request still needs a whole-image review.
A quick review checklist
Work through these five checks before you decide what to change next.
- Openings: count the windows, doorways and visible window divisions.
- Fixed fittings: locate the radiator, fireplace and built-in features.
- Viewpoint: compare wall edges and the amount of floor in view.
- Furniture positions: check which wall each main piece sits against.
- Proportions: look for an unexpectedly wider opening or deeper room; verify actual clearances with measurements.
4. Refine one decision at a time
When a concept is worth developing, select it as the base for a follow-up in the project and describe one focused revision. This keeps your next decision clear: you are choosing a curtain tone, for example, rather than simultaneously judging new flooring, furniture, and lighting.
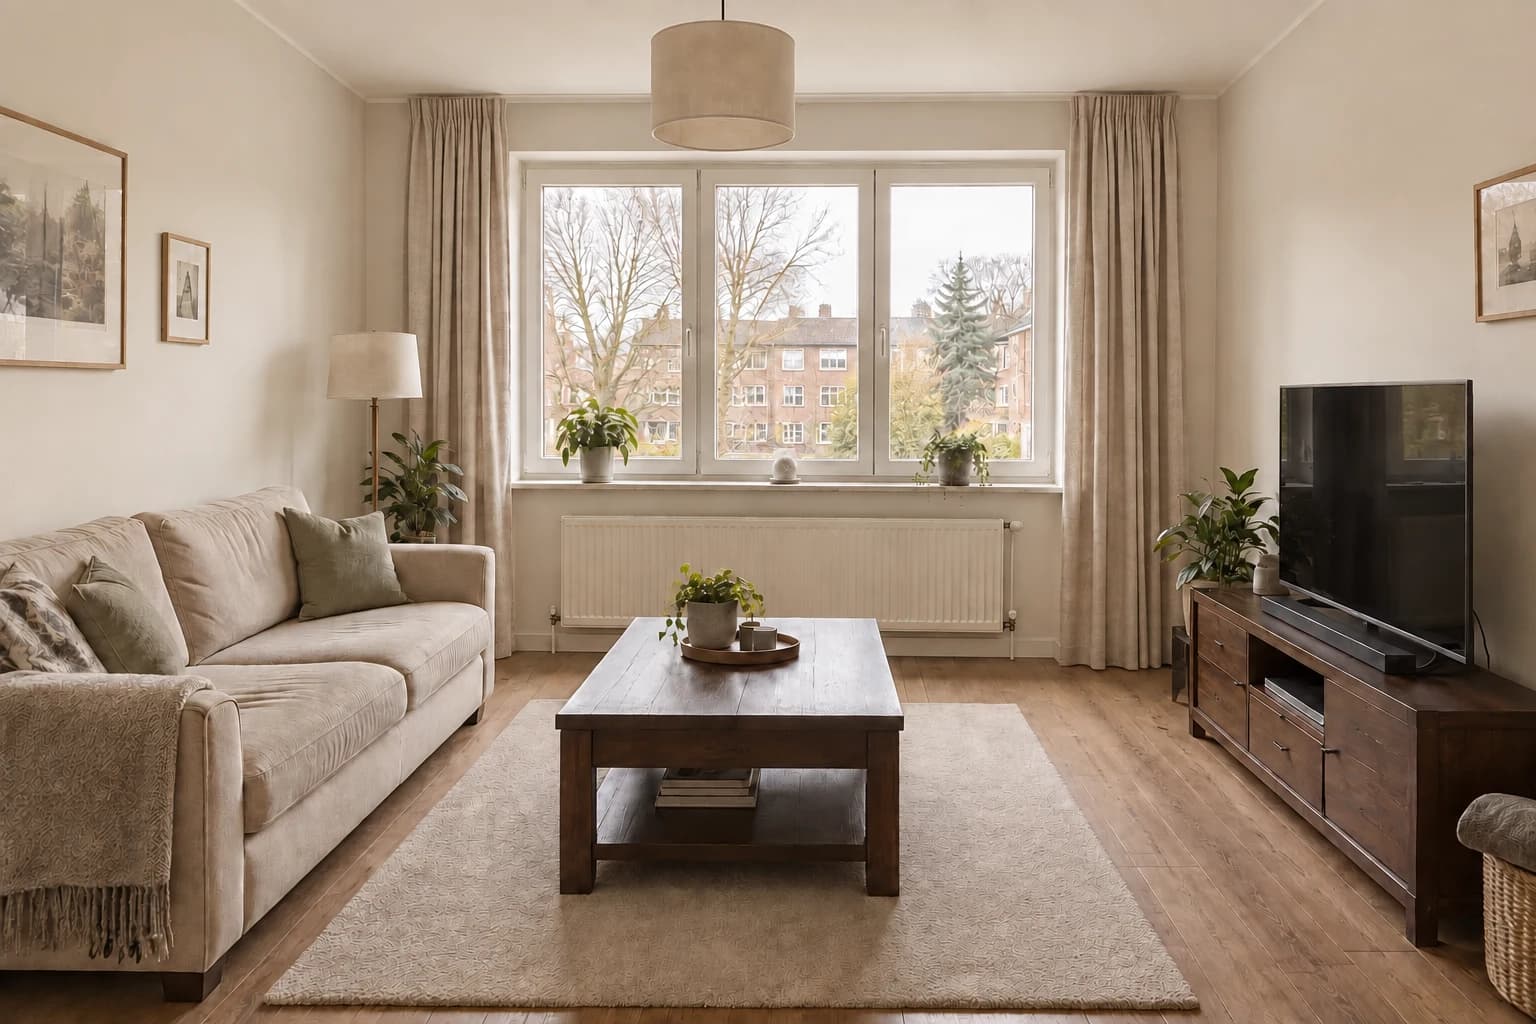
The follow-up below uses the first concept as its base and asks for muted oatmeal linen curtains. The change is subtle, which is useful when you are choosing between nearby tones. The throw and rug texture also differ, so compare the revision with both its immediate base and the original image before accepting it.
If you want to compare two curtain colors, start each alternative from the same acceptable base. Continuing from the last alternative can carry its other changes into the next option, making the comparison harder to interpret. Keep a short note of the requested change so that an appealing image does not become detached from the decision it was meant to answer.
5. When the layout drifts, choose the next move
A discrepancy does not always need another round of detailed prompting. First ask whether the current result remains a useful base. A minor unwanted styling change may be worth one correction; a missing doorway or substantially altered viewpoint is a stronger reason to restart from the original with a narrower brief.
Use the table to choose your next step. The possible causes are starting points for troubleshooting; inspect the new image before deciding whether the change helped.
Refine the current concept
Continue when the main openings, viewpoint and furniture arrangement still fit your brief, and the remaining change is specific: a curtain tone, a cabinet finish or a visible detail.
Restart from the original
Go back when an important opening has moved, the viewpoint no longer matches, or you would need several corrections just to recover the room. Narrow the brief before generating again.
| What you notice | Possible cause | What to try next |
|---|---|---|
| Window divisions have changed | The opening was partly obscured or reinterpreted | Keep the original window opening and all visible divisions; change only the wall finish. |
| A radiator has disappeared | The styling request may have encouraged a cleaner wall | Retain the radiator below the window in its original visible position. |
| Furniture has moved | A broad redesign request may imply a new arrangement | Keep the sofa against the left wall and the cabinet on the right; revise only the curtains. |
| The room appears much deeper | Perspective or proportions may have drifted | Return to the original input and request a smaller material change with the same viewpoint. |
| Each revision looks less like the original | Changes may have accumulated across successive bases | Return to the last acceptable base or the original photo instead of extending this sequence. |
6. Stop when you have a useful direction
The goal is a concept that helps you choose what to explore next. Once a wall-and-curtain pairing looks promising, compare physical samples in the real room. Your screen, the generated lighting, and the model’s interpretation can all affect the apparent color and texture.
If a proposal involves moving furniture, measure the actual pieces and available space. If it changes an opening, a fixed fitting, or the structure, discuss it with the appropriate professional. A photorealistic image does not confirm dimensions, regulations, installation requirements, or whether the work can be built.
Keep the original photo alongside the preferred concept and a brief note of the intended changes. That combination is more useful for a renovation conversation than an image presented without context. Label the concept as AI-generated, and make any unresolved differences explicit.
Questions about keeping a room layout
Can AI keep my room exactly the same except for one change?
You can request a focused change, but cannot assume that everything else will remain identical. Check the whole result, including details away from the requested edit. Use the image to explore a direction rather than to verify exact geometry or product identity.
Should I repeat the fixed features in every follow-up?
It can help communicate your priorities, especially after an unwanted change. Keep the list short and specific to the visible room. Prioritize the feature that drifted, then review its relationship with the rest of the room.
Should I use a photo or a floor plan?
For this workflow, use a photograph of the existing room. It shows the viewpoint, finishes, and visible relationships you are trying to retain. Keep a measured floor plan separately for checking dimensions and planning the physical space.
What if another correction still changes the layout?
Return to the original image, reduce the scope, and check whether your input clearly shows the important features. If the result remains inconsistent, use it only as broad inspiration. Additional generations do not guarantee that a persistent architectural error will be resolved.